# An Opinionated Guide on how to work with SF B2B Commerce
# Project Setup
- IDE of Choice: VS Code, with Salesforce Extensions for VS Code installed. Additional extensions:
- Version control of Choice: Anything Git compatible (Github, gitlab, bitbucket), as long as it supports pull requests. We'll use gitlab Today.
- CI/CD Tool: Jenkins, with SFDX CLI installed in the server
For general org development (e.g. creating classes, deploying static resources, testing SOQL queries, debuging, etc.) we use SFDX in VS Code via the Salesforce Extensions.
# Project Structure
We use the SFDX default project structure, and package.xml to manage the files to download/upload from the salesforce org.
.
+-- .sfdx
+-- .vscode
+-- config
+-- force-app
|   +-- main
|       +-- default
|           +-- applications
|           +-- aura
|           +-- classes
|           +-- components
|           ...
|           +-- staticresources
|           +-- tabs
|           +-- triggers
+-- manifest
|   +-- package.xml
+-- .forceignore
+-- .gitignore
+-- README.MD
+-- sfdx-project.json
2
3
4
5
6
7
8
9
10
11
12
13
14
15
16
17
18
19
20
21
WARNING
Forcecode is also a favorite of ours, but SFDX tooling gets better everyday. Might as well spend a few extra minutes to learn the newer SFDX project structure instead of the classic one. We will be taking advantage of this structure in the future.
# Typical modifications
B2B commerce golden rules:
- Try to use configuration settings first.
- Use extensions when it makes sense.
- Avoid creating new custom classes that duplicates functionality (prefer extensions).
# Our rules
| Rule | Reason | "Traditional" Approach |
|---|---|---|
| Convention over configuration | B2B is made for power users (you know, the one who clicks-not-code), with tons of configuration settings. But to support those, the product is very complex. Most of us don't need the huge data model behind it (e.g. for product images), and could use some conventions instead. It not only make things more performant, but also easier to maintain | Configure everything, because it requires less code |
| Extensions over custom controllers | We avoid creating controllers/remote actions if we can instead extend the CC Services/Logic classes to get the same results. Since the default CC Services/Logic classes may be called anyways, extending them should be in general more performant than adding another layer of queries on top of the default functionality | Create as many custom controllers with remote actions as needed |
| It's a connected world | Just because B2B commerce is on top of Salesforce doesn't mean you can't use other systems, like external databases, custom load balancers, your own front end, etc. Do what makes sense to your business, not to Salesforce | Use Salesforce for everything |
| Keep it simple and focused | E.g. Common Remote Action Controller in one file, instead of having one controller per page. And have the remoteactions defined here for better code organization (allegedly) | One or more controller per page include |
# List of modifications
So to make things easier for the developers, here is a short list of basic extensions that we use as a "starter pack" for our storefronts:
| Modification | Level of Effort | Reason | "Traditional" Alternative |
|---|---|---|---|
| Custom Theme | Varies | The OOTB theme is too plain | You still need a custom theme, but they say to leverage common Bootstrap 3 themes out there, with lots of wasted styles and missing opportunities |
| Custom HK_UserInterface | Low | Adds the ability to have additional js and css libraries added to the header and footer, including external ones, e.g. CDNs | Config settings limited to your current theme static resource (no CDN) |
| External Handlebars | Medium | Modifying HTML elements in pure js is a more clean approach than the VF page include one. They can also be cached, compiled and/or put into a CDN for extra performance. They are also more portable | Page Includes |
| Custom Header | |||
| Custom Footer | |||
| Custom Search | |||
| Custom fields shown in the results | |||
| Custom Filters | |||
| Google Analytics | |||
| Friendly URLs | To be honest, you should consider using domain managers with redirection rules for this instead. | ||
| Dataloader scripts | Controlling what data gets updated via a version control system is easier to maintain than via the power user approach | ||
| LWC for Sales reps | There is a CSR flow as part of B2B, but many times the internal sales representatives requires a more "salesforce-y" experience. We need some kind of Lightning experience built for order placement. |
WARNING
Remember: these are just guidelines, and you are free to follow it or not. I.E. some architects may prefer to keep everything as modular as possible, or to not code at all if they can help it. This could add up to the technical debt, and deployment risks, since it adds complexity instead of simplicity; but may be safer to upgrade to a newer B2B commerce version (in theory).
Bottom line is that you should do whatever makes sense for you and your team, in the context of the solution.
P.S. Salesforce services may have a different opinion on the above, and prefer the "traditional" alternative of course 😃
# Examples
WIP
# Release Management
# Development Enviroment
# Requirements
- A personal sandbox, with the B2B Managed Package installed (it is important that is using the same version and patch), as well as any other Managed Packages to be used in the project
Why not Scratch Orgs?
Right not there is no easy way to work with Managed Packages in scratch orgs (it takes too much time to provision a scratch org with managed packages!!)
- VS Code with Salesforce Extension Pack enabled
- SFDX CLI
- Code style guide
- Git with a project repo (branched as suggested below), with git credentials provided and set
# VS Code
# Setting up the Project as the Tech Lead/Architect (One time only)
- Open VS Code
- Create a folder for your new project, and open it
- Open the Command Palette (CTRL+SHIFT+P). Type: SFDX Create Project with Manifest. Enter a name for your project, and select the folder you just created above.
- Set up the git repo
- In VS Code, open the Terminal
- Type
git init - Add the git remote
git remote add origin <YOUR PROJECT GIT URL>. E.g.git remote add origin git@gitlab.com:54chi/b2bckz_demoproject.git<-- This assumes the repo is empty, but there are other alternatives if the repo exist too. Check git documentation for this
- Download your org code
- Open the Command Palette (CTRL+SHIFT+P). Type: SFDX Authorize an Org. Depending on the type of org you got, pick sandbox (usually) or production (if a trial org)
- Enter an alias (can be anything, including blank) and hit ENTER. This will open a browser for you to login into the org. Enter the credentials for your personal sandbox
- Once you log in succesfully, you can close the browser
- Update the package.xml file under
manifest/package.xml. See package.xml below for an example. - From the VS Code file explorer, right click on package.xml and click on SFDX Retrieve Source in Manifest from Org. This will retrieve whatever non-packaged source files ara available, and place them under
force-app\main\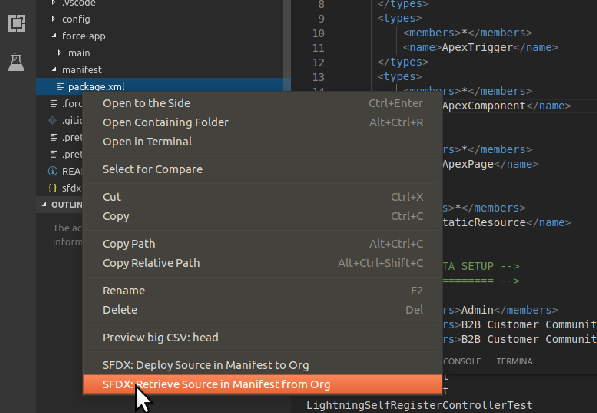
- Update the .gitginore file to your project to prevent unneede files getting commited. See .gitignore below for an example.
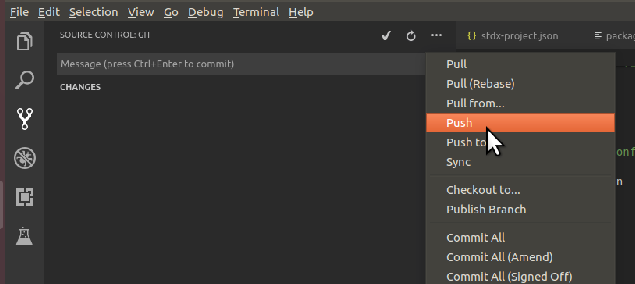
- Deploy the first version to the repo (this will go to the master branch initially)
- From the VS Code Terminal
- Type
git add --all .thengit commit -m "initial commit"and finallygit pushto send the code to the repo - If CLIs are not for you, you could alternatively use VS Code IDE for that. E.g.

- Open the repo and confirm your project has been commited successfully
# Setting up the project as a Developer (One time only)
- Open VS Code
- Create a folder for your new project, and open it
- Open the Command Palette (CTRL+SHIFT+P). Type: SFDX Create Project. Enter a name for your project (e.g
.), and select the project folder. Note how no manifest was selected. - Click on the "No Default Org Set" SFDX menu at the bottom.

- From the popup menu, click on SFDX: Authorize an Org to associate the code to your personal sandbox and authorize your org.
- Delete
config/project-scratch-def.json,.forceignore, .gitignore, .prettierignore, .prettierrc and README.mdandforce-app/main/default/lwc/.eslintrc.jsonfiles. - Open a VS Code terminal and clone the repo created by the architect/technical lead in the steps above into the current project folder. E.g.
git init
git remote add origin <YOUR PROJECT GIT URL> #<-- e.g. git remote add origin git@gitlab.com:54chi/b2bckz_demoproject.git
git fetch
git checkout --track origin/dev
git pull
1
2
3
4
5 - Open VS Code and open the cloned project folder
- Create the Git branches for the project
# Working with the project as a Developer (Every time)
- Make sure you are in either dev or your own branch:
git branchto see the list of branches. git pullto retrieve the latest from the server for that branch- Create a branch for the functionality you'll be working on, and develop in your personal sandbox.
- Commit code to your local repo often to reduce the risk of losing your changes. At least once a day commit your code to the remote repo as a backup.
- When ready, create a pull request and assign the technical lead as a reviewer and/or approver.
WARNING
To commit to the dev branch, you could do git push origin HEAD:dev, but try to avoid this if working in larger teams. Instead, create a branch for your code and request a pull request into dev when ready.
WARNING
You should update these steps to what makes sense for you and your team in the context of the solution. E.g. how to do QA (merge conflicts, rejections, bugs), how to manage change requests, how to deal with integrations. etc. etc.
Remember: these are just guidelines. Your project needs and standard practices may be different.
# Version Control (e.g. Github, Gitlab, Bitbucket)
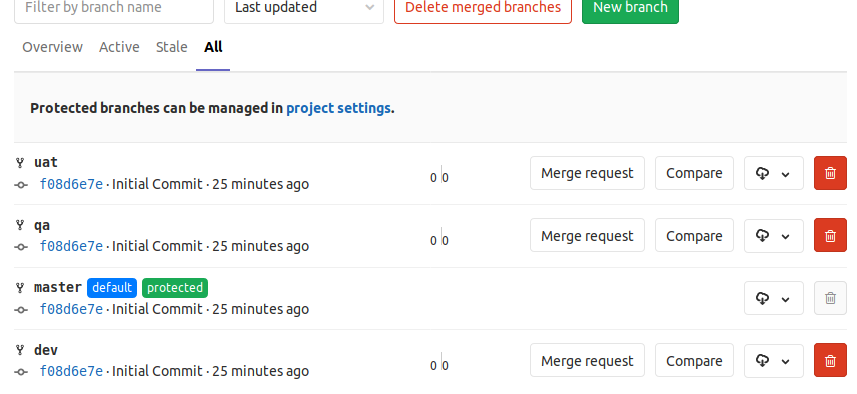
- Create the Git branches to compartmentalize your code for release management:
- uat branch, to be derived from master
- qa branch, to be derived from UAT
- dev branch, to be deived from qa
- E.g. branches created in a gitlab project:
- Assign the team members to the branches accordingly.
- Consider adding additional permissions/restrictions to the branches (e.g. nobody can commit to master, require code comments, approvals, etc. etc.)
# Continuous Integration (QA Sandbox)
Either you use jenkins, travis, gitlab, etc. a CI/CD tool should follow some variation of these steps:
- Upon a pull request approved and merged into the qa branch, a "hook" connected to it will activate the CI process. The CI process will:
- Prepare a list of the files that were changed between the previous deployment and the new one (e.g. using
git diff) - Use the list to then deploy the changes to the salesforce org (using
force:source:deploy) - If there is data to deploy (e.g. configuration settings), deploy them as well
- Send an alert with the results
- Manual post deployment steps are then made (e.g.indexing, cache and all that stuff)
- Besides the automated method, there should be a way to execute these steps manually and revert the changes if something didn't work.
# Continuous Delivery (UAT Sandbox)
This is similar as the Continuous Integration (QA Sandbox), with the following differences:
- The "hook" is the merge into UAT branch
- The git difference is taken from the uat branch, as well as the code to be deployed
- The data to be deployed should work in UAT (some config settings may be a bit different)
# Release (Production Sandbox)
- The "hook" is the merge into master branch
- The git difference is taken from the master branch, as well as the code to be deployed
- The data to be deployed should work in PROD (some config settings may be a bit different)
WARNING
This Release Management approach assumes there are no separate projects that merge in the same "master" repo.
If that's not the case, make sure to have mechanisms in place to keep your repos in sync (e.g. uat, qa and dev across multiple projects into one master repo).
# Extras
# SFDX 101
WIP
Create files (e.g. creating a class called
czk54_hk_UserInterface)sfdx force:apex:class:create --classname ckz54_hk_UserInterface --template DefaultApexClass --outputdir force-app/main/default/classes1Deploy files (e.g. deploying a class called
czk54_hk_UserInterface)sfdx force:source:deploy --sourcepath force-app/main/default/classes/ckz54_hk_UserInterface.cls1Get latest files
sfdx force:source:retrieve -x manifest/package.xml1Static resources
Packages?
DATA!
sfdx force:data:tree:export -q "SELECT Id, Name FROM ccrz__E_Product__c limit 10" -d ./json
sfdx force:data:tree:import -f ./json/ccrz__E_Product__c.json
sfdx force:data:record:update -s ccrz__E_Product__c -w "ccrz__SKU__c=633724-001" -v "Name=BOOOO"
sfdx force:data:record:create -s Account -v "Name='Universal Containers' Website=www.example.com"
sfdx force:data:record:delete -s Account -i 001D000000Kv3dl
1
2
3
4
5
# Jenkins 101
Jenkins is the most popular CI/CD tool out there and is typically already part of the org. Most tutorials out there are for scracth orgs (which we are not using). We are also not using the "mdapi" project structure (aka the "classic" structure from a few years ago). Here are some of the scripts we use:
# Finding the git differences
WIP and output to a file
# Deploying changes
WIP
Authorize to an org
sfdx force:auth:jwt:grant --instanceurl https://test.salesforce.com
  --clientid ${SF_CONSUMER_KEY}
  --jwtkeyfile ${server_key_file}
  --username ${SF_USERNAME}
  --setalias QA
2
3
4
5
Deploying changes
sfdx force:source:deploy --wait 10 --deploydir ${DEPLOYDIR} --targetusername UAT --testlevel ${TEST_LEVEL}
# Deploying data
WIP We'll use the csv version, since there is plenty of B2B commerce sample data in csv, but you could also use json if needed
sfdx force:data:tree:import -f ./json/ccrz__E_Product__c.json
# git 101
git branch #<-- list of local branches
git checkout -b feature1 #<-- creates a local branch called "feature1", and switchs to it
git checkout dev #<-- switch to "dev" branch
git pull #<-- gets the latest changes from the remote branch into the local one
git add --all . #<-- adds all the unstaged files to the local repo
git commit -m "update details" #<-- commit the files with the message "update details"
git push --set-upstream origin feature1 #<-- creates a feature1 branch in the remote and push changes to it
git push origin dev #<-- push changes to the dev remote branch
git push origin feature1 #<-- push changes to the feature1 remote branch
2
3
4
5
6
7
8
9
# Sample Starting Package.xml
<?xml version='1.0' encoding='UTF-8'?>
 <Package xmlns='http://soap.sforce.com/2006/04/metadata'>
    <!-- CODE CUSTOMIZATIONS -->
    <!-- =================== -->
     <types>
         <members>*</members>
         <name>ApexClass</name>
     </types>
     <types>
         <members>*</members>
         <name>ApexTrigger</name>
     </types>
     <types>
         <members>*</members>
         <name>ApexComponent</name>
     </types>
     <types>
         <members>*</members>
         <name>ApexPage</name>
     </types>
    <types>
        <members>*</members>
        <name>StaticResource</name>
    </types>
    <types>
        <members>*</members>
        <name>LightningComponentBundle</name>
    </types>


    <!-- METADATA SETUP -->
    <!-- ============== -->
     <types>
         <members>Admin</members>
         <members>B2B Customer Community Plus User</members>
         <members>B2B Customer Community User</members>
         <name>Profile</name>
     </types>
     <types>
         <members>ccrz__E_Product__c</members>
         <members>ccrz__E_Category__c</members>
         <members>ccrz__E_Attribute__c</members>
         <members>ccrz__E_ProductCategory__c</members>
         <members>ccrz__E_Spec__c</members>
         <members>ccrz__E_ProductSpec__c</members>
         <members>ccrz__E_ProductMedia__c</members>
         <members>ccrz__E_PriceList__c</members>
         <members>ccrz__E_PriceListItem__c</members>
         <members>ccrz__E_Cart__c</members>
         <members>ccrz__E_CartItem__c</members>
         <members>ccrz__E_Order__c</members>
         <members>ccrz__E_OrderItem__c</members>
         <name>CustomObject</name>
     </types>
     <types>
         <members>ccrz__E_Product__c-ccrz__CC Product Layout</members>
         <members>ccrz__E_Category__c-ccrz__CC Category Layout</members>
         <members>ccrz__E_Attribute__c-ccrz__CC Attribute Layout</members>
         <members>ccrz__E_ProductCategory__c-ccrz__CC Product Category Layout</members>
         <members>ccrz__E_Spec__c-ccrz__CC Spec Layout</members>
         <members>ccrz__E_ProductSpec__c-ccrz__CC Product Spec Layout</members>
         <members>ccrz__E_ProductMedia__c-ccrz__CC Product Media Layout</members>
         <members>ccrz__E_PriceList__c-ccrz__CC Price List Layout</members>
         <members>ccrz__E_PriceListItem__c-ccrz__CC Price List Item Layout</members>
         <members>ccrz__E_Cart__c-ccrz__CC Cart Layout</members>
         <members>ccrz__E_CartItem__c-ccrz__CC Cart Item Layout</members>
         <members>ccrz__E_Order__c-ccrz__CC Order Layout</members>
         <members>ccrz__E_OrderItem__c-ccrz__CC Order Item Layout</members>
         <name>Layout</name>
     </types>
<!--
    <types>
        <members>*</members>
        <name>Flow</name>
    </types>
    <types>
        <members>*</members>
        <name>FlowDefinition</name>
    </types>
    <types>
        <members>*</members>
        <name>Workflow</name>
    </types>
-->
     <version>45.0</version>
 </Package>
2
3
4
5
6
7
8
9
10
11
12
13
14
15
16
17
18
19
20
21
22
23
24
25
26
27
28
29
30
31
32
33
34
35
36
37
38
39
40
41
42
43
44
45
46
47
48
49
50
51
52
53
54
55
56
57
58
59
60
61
62
63
64
65
66
67
68
69
70
71
72
73
74
75
76
77
78
79
80
81
82
83
84
85
86
# Sample .gitignore (for ckz54_ prefix)
WARNING
Note the usage of "!prefix_" (e.g. ckz54 - at line 58) as a way to isolate code changes to the things made specifically for this project (assuming your naming convention uses ckz54 as the prefix for everything customized)
# This file is used for Git repositories to specify intentionally untracked files that Git should ignore.
# If you are not using git, you can delete this file. For more information see: https://git-scm.com/docs/gitignore
# For useful gitignore templates see: https://github.com/github/gitignore

# Salesforce cache
.sfdx/

# Logs
logs
*.log
npm-debug.log*
yarn-debug.log*
yarn-error.log*

# Dependency directories
node_modules/

# Eslint cache
.eslintcache

# MacOS system files
.DS_Store

# Windows system files
Thumbs.db
ehthumbs.db
[Dd]esktop.ini
$RECYCLE.BIN/

# ignore VCode config files
force.json
sfdx-project.json
.forceCode
.sfdx
.vscode
*.code-workspace
*.log
coverage

# ignore classes, components, pages, static resources and metas from salesforce...
/lwc
*.cls
*.cls-meta.xml
*.component
*.component-meta.xml
*.page
*.page-meta.xml
*.resource
*.resource-meta.xml
*.trigger
*.trigger-meta.xml
*.flow
*.flowDefinition
*.workflow
*.field-meta.xml

# ...with the exception of the package.xml and anything that starts with the naming convention
!package.xml
!ckz54_*
!README.MD
2
3
4
5
6
7
8
9
10
11
12
13
14
15
16
17
18
19
20
21
22
23
24
25
26
27
28
29
30
31
32
33
34
35
36
37
38
39
40
41
42
43
44
45
46
47
48
49
50
51
52
53
54
55
56
57
58
59
60
References:
- https://code.visualstudio.com/
- https://marketplace.visualstudio.com/items?itemName=salesforce.salesforcedx-vscode
- https://trailhead.salesforce.com/en/content/learn/projects/automate-cicd-with-gitlab
- https://hatarakimaseando.wordpress.com/2018/12/13/pininos-en-salesforce-devops/
- https://salesforce.stackexchange.com/questions/269838/sfdx-cli-forcesource-vs-forcemdapi
- https://forcedotcom.github.io/salesforcedx-vscode/articles/user-guide/org-development-model