# Extending the Front End
Modifying the front-end is one of the most common custom code you'll ever do, for any storefront. More often than not it's not just some CSS, but also the HTML structure itself.
Sadly, there isn't much documentation on how to do that.
Until now.
# Intro: The Salesforce way
Configuration over Convention
- Maximize the usage of configuration settings to hide/show stuff.
- If possible, try not to modify too many handlebars templates.
- It's ok to change the stylesheet via the theme file though.
Realistically, the above statements may not be enough for many storefronts UI requirements.
When that happens, this is what we are taught to do (as of 2019):
- Open the storefront page you want to modify/update.
- Find the uiproperty to change by looking into the source code of the HTML of the page (hoping you will find it).
- Create a new Visualforce page and write your custom handlebars js code within the Apex page. IMPORTANT: Don't forget to include those four VF page header declarations! E.g.
<apex:page docType="html-5.0"
sidebar="false" showHeader="false" standardStylesheets="false"
applyHtmlTag="false"
id="ckz54_MyCustomVFPageBodyInclude">
...
<!-- CUSTOM CODE GOES HERE -->
...
</apex:page>
1
2
3
4
5
6
7
8 - Do the same if adding Visualforce components.
- In the vf page/component, replace the OOTB handlebar template with the one you created in the steps above (the new uiproperty)
- In CC Admin, create a Page Include and point it to the visualforce page you created.
- Create and activate a new configuration cache.
- Rinse and repeat for every page where you want to update the UI.
TL;DR: The standard approach to extend the handlebars templates requires adding page includes. The page includes then are used to refer a custom VF page. In the VF page (or VF components included in that VF page), the handlebars overrides are written, and then a js code is added to replace the default CCRZ.uiproperties to use the new template. This also requires a new configuration cache to be made.
When multiple handlebars are required, this process may be cumbersome and hard to maintain.
# The Missing SF B2B Guide way
Covention over Configuration
- You shouldn't need a page include unless there is a custom controller in it.
- All Handlebars overrides are stored in the Theme's static resource.
- No Visualforce page code needed. It's just handlebars.
- Other than setting the storefront theme to use, there is no Configuration Cache updates needed.
Know Your Basics
It's important to have a solid foundation on handlebars, backbone and css.
Why this works:
All themes comes with a js/uiproperties.js file, called at the beginning of the page, across the storefront. It's main purpose is to define custom CCRZ.uiproperties, but is a normal javascript file.
| PROs | CONs |
|---|---|
| * No need to refresh configuration cache (other than setting the storefront theme) | * You have to know Handlebars and Backbone (not difficult, but not as well known as jQuery) |
| * Easy to port (since all the customizations are in the theme file) | * Collaborating on a static resource may be prone to conflicts (since it is a zip file and different people may be working on different parts of it at the same time) |
# High level solution
- Find the uiproperty to override.
- Create the handlebars templates as you would normally do it, if you were a front end developer (aka: "normal" js, aka: not within an apex page) and create a
CCRZ.uipropertiesentry to use the custom handlebars.
# Step by Step
These instructions assumes you have a custom theme enabled and available in your VS project.
# Step 1. Finding the uiproperty to override
- In your SFDX B2B Commerce, open your theme file in your favorite IDE (e.g VS Code)
- Under the
jsfolder, edituiproperties.js. Add the following code:jQuery(function($) { // override to display handlebars ID if cclogToken is present CCRZ.util.template = function(id) { var source = $('#' + id).html(); preSource = "<div class='internalHB'>"+id+" ("+ckz54_findUIProperty(CCRZ.uiProperties,id).join(";")+")</div>"; source =((CCRZ.getCookie("apex__cclgtkn")!="")?"<div class='cc_hb'>"+preSource+ source + "</div>":source) ; return Handlebars.compile(source); } // finds what is the CCRZ.uiproperty for the value passed: ckz54_findUIProperty = function(uiPropertyArray,strToFind){ let arrKeys=Object.keys(uiPropertyArray); var uiTest = false; var uiArray =[]; var regex; for (uiKey of arrKeys){ uiTest = false; replaceThis='(("tmpl":"'+strToFind+'"))'; regex = new RegExp(replaceThis, 'g'); uiTest=JSON.stringify(uiPropertyArray[uiKey]).match(regex); if (uiTest) { uiArray.push(uiKey) } } return uiArray; } });1
2
3
4
5
6
7
8
9
10
11
12
13
14
15
16
17
18
19
20
21
22
23
24
25
26 - Under the
css3folder, editstyles.css. Add the following code:.cc_hb:hover{ background-color: #aefaaefb; border:dashed 2px #aca9a9; } .cc_hb:hover > .internalHB, .cc_hb:hover > .externalHB { color: blue; } .internalHB{ color:crimson; font-size:10px; } .externalHB{ color:peru; font-size:10px; }1
2
3
4
5
6
7
8
9
10
11
12
13
14
15 - Save the files and deploy the static resource (if using VS code, right click on the file and select
SFDX: Deploy Source to Org) - In a browser, open the storefront, and add the ccLog token at the end of it.
- If successful, you would see the name of the current handlebars template and, between parenthesis the name of the CCRZ.uiproperty that you would need to update if you want to override the handlebars. E.g.
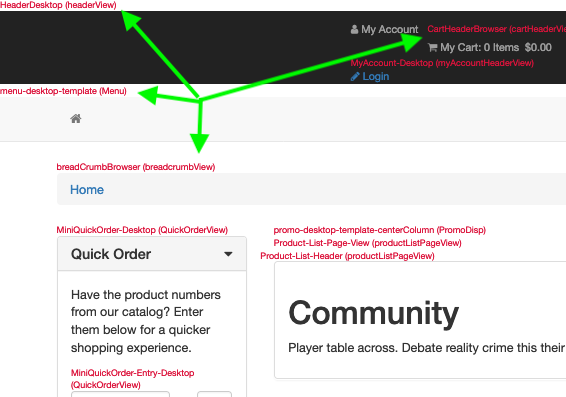
Explanation:
- We are overriding the OOTB
CCRZ.util.templateto wrap the handlebars in additional HTML to display the id and the CCRZ.properties where it is used. - Because we only need this for development, we add a check to only show these values when the ccLog token (cookie) is present.
# Step 2. Creating a Handlebars Template
- Back in your favorite IDE (e.g VS Code)
- Edit
uiproperties.js. We'll add support for "external handlebars", so replace theCCRZ.util.templatecode written in step 1 with the following:// replaces CC's OOTB rendering for handlebar templates (to support external ones) CCRZ.util.template = function(id) { const uncompiledHB=".hbs"; var source = $('#' + id).html(); if (_.isUndefined(source)) { // Load external handlebar; source = ''; // Get template from the hbs folder if(id.indexOf(uncompiledHB)>=0){ $.ajax({ url: CCRZ.pagevars.themeBaseURL + "tmpl/hbs/"+id, cache: true, async: false, success: function(data) { preSource = "<div class='externalHB'>"+id+" ("+ckz54_findUIProperty(CCRZ.uiProperties,id).join(";")+")</div>"; source = ((CCRZ.getCookie("apex__cclgtkn")!="")?"<div class='cc_hb'>"+preSource+ data + "</div>":data); } }); } } else { // Load internal handlebar (aka: OOTB approach) preSource = "<div class='internalHB'>"+id+" ("+ckz54_findUIProperty(CCRZ.uiProperties,id).join(";")+")</div>"; source =((CCRZ.getCookie("apex__cclgtkn")!="")?"<div class='cc_hb'>"+preSource+ source + "</div>":source) ; } return Handlebars.compile(source); }1
2
3
4
5
6
7
8
9
10
11
12
13
14
15
16
17
18
19
20
21
22
23
24
25
26 - Before the jQuery section, add these CCRZ.uiproperties override:
CCRZ.uiProperties = $.extend(true,CCRZ.uiProperties,{
    headerView: {
        desktop: {
            tmpl: 'ckz54_header.hbs'
        }
    }
});

//JS functions and overrides for ckz54 Theme
jQuery(function($) {
    // replaces CC's OOTB rendering for handlebar templates (to support external ones)
    CCRZ.util.template = function(id) {
        ...
1
2
3
4
5
6
7
8
9
10
11
12
13 - Under the
jsfolder, create atmplfolder. Under thetmplfolder, create ahbsfolder. This is where were we'll store the uncompiled external handlebars. - Under
js\tmpl\hbsfolder, create a file calledckz54_header.hbs. Enter the following code:<a href="#" id="logoUrl"><div id="cc_store_logo_img" class="cc_store_logo_img"></div></a> <h1>THIS IS A HANDLEBARS TEST</h1> <div class="navbar-inverse" id="ckz54Header"> <div class="container"> <div class="row"> <div id="ckz54Locale" class="col-md-4 col-xs-12"> <div class="pull-left"> <span class="misc-function" /> <span class="lssec"></span> </div> </div> <div id="ckz54Account" class="col-md-5 col-xs-12"> <div class="pull-right"> <ul class="list-inline navbar-nav"> <li> <a href="#" id="goToAccount"><i class="fa fa-user" aria-hidden="true"></i><span>{{pageLabelMap 'Component_SiteHeader_MyAccount'}}</span></a> </li> <li> <a href="#" id="cartHeader" class="chead cartHeaderLink"></a> </li> <li class="loginoutsec"></li> </ul> </div> </div> <div id="ckz54Search" class="col-md-3 col-xs-12 pull-right"> <div class="search_form" /> </div> </div> </div> </div>1
2
3
4
5
6
7
8
9
10
11
12
13
14
15
16
17
18
19
20
21
22
23
24
25
26
27
28
29
30 - Save the files and deploy the static resource (if using VS code, right click on the file and select
SFDX: Deploy Source to Org) - Refresh your storefront page.
- If successful, you would see the new Handlebars override.
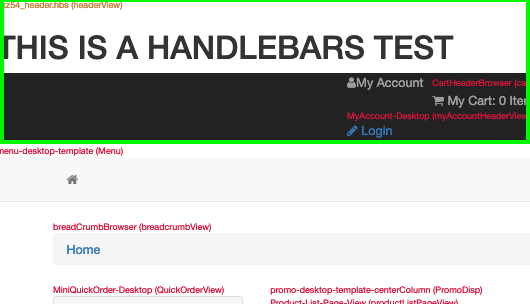
Explanation:
- This overrides will check for the "tmpl/hbs/" folder if the handlebars have a ".hbs" suffix in the id value (which we define in CCRZ.uiproperties, in this case for the headerView)
- Note how much cleaner the handlebars override is in this case (the .hbs file is just handlebars. No Apex or jQuery or anything else)
- No Configuration Cache refresh required
No more Page Includes for Handlebars overrides
- You can use this convention to add all the handlebars overrides under the
/hbsfolder, and updateCCRZ.uiPropertiesjs array, but depending on the uiProperty, additional entries (selector attribute, different structure, etc.) may be required. E.g... CCRZ.uiProperties = $.extend(true,CCRZ.uiProperties,{ headerView: { desktop: { tmpl: 'ckz54_header.hbs' } }, SellerLocatorSearchView : { desktop : { tmpl : 'ckz54_sellerLocatorMap.hbs', selector : '.seller-locator-search' } }, PaymentsPOView: { desktop: { tmpl: 'ckz54_payments.hbs', selector: '.paymentContainer' } }, productDetailView: { desktop: { tmpl: 'ckz54_ProductDetail.hbs', right: { selector: '.right_column .widgetSection' }, main: { selector: '.prodDetailContainer' }, } } }); ...1
2
3
4
5
6
7
8
9
10
11
12
13
14
15
16
17
18
19
20
21
22
23
24
25
26
27
28
29
30
31
32 - We recommend to have a "common style" theme to use as a base for any of your Storefronts, and build additional themes on top of it
- You can have custom themes per Account Groups (plus you can further modify this behavior via cc_hk_DynamicTheme extension!). In other words, with this approach that the same storefront could have completely different look and feel depending on who is logged (and not just the stylesheet!!)
Keep an eye on these
- Because these are pure handlebars, it's recommended to avoid using jQuery or any kind of inline js within the template. Instead, you should stick with handlebars helpers or similar. You can even have helpers to set up the backbone view, or additional click events, etc.
- Some OOTB handlebars are used in different CCRZ.uiproperties. AND VICEVERSA (depending on some conditions, some handlebars may be chosen instead of others)
- To keep it simple, we are not covering the use of Handlebars partials. We found that OOTB partials are not really that reused among the handlebars, so more often than not, we replace them with inline partials instead of adding additional js code to support external partial files.
# Extras
# Homework
- For better performance, it's better to compile the templates before deploying to production.
- B2B commerce OOTB handlebars templates are over engineered to cover configuration settings and edge cases. Feel free to use lighter and handlebars templates that are closer to your needs, but don't overlook the power of having some configuration settings available (sp. for display or translations purposes)
Extending the HK User Interface
We could put every js we needed under uiproperties.js and that'll be ok for the browser. However, it is not a very good structure for the developers. It will be easier if you split the file in several ones for ease of maintenance. For example, we like to split the custom js files this way:
- uiproperties.js, ONLY to keep the uiproperties overrides.
- myPrefix_hbs.js, for handlebars functions, including helpers.
- myPrefix_app.js, for anything else (e.g. js constants, google analytics code, etc.)
These can be defined via a hk_userinterface extension. In addition, we can use this file to modify the js files that get loaded OOTB, add a favicon, etc.
These are to help keep the code clean. When deploying these to production, a good practice is to always compile the handlebars, and minimize and bundlify the rest of js and css files. And if using a CDN, cache the file(s).
# Compiling Handlebars
In order to compile your templates, you will need handlebars to be installed in your machine. Alternatively, you could use the docker container maintained by "office numero 2" here: https://hub.docker.com/r/numero2/num2_handlebarsgulp/
Once you have handlebars installed, all you need to do is run this command (for each file):
handlebars hbs/<uncompiled_handlebars_file.hbs> -f <compiled_handlebars_file.tpl.js>
# CDN tips
You may have to update the paths of the CCRZ.util.template or customize hk_userinterface class to point to the CDN (by default it will look only within your Org's storefront)
Cache the JS and CSS in the browser! (Salesforce has a limited control of what you can cache and for how long if not using a CDN)
- Do:
- Use the Cache-Control and ETag headers to control cache behavior for static assets
- Set long max-age values to reap the benefits of browser cache
- Use fingerprinting or versioning for cache busting
- Don't:
- Use HTML meta tags to specify cache behavior
- Use query strings for cache busting
References: